
| 일 | 월 | 화 | 수 | 목 | 금 | 토 |
|---|---|---|---|---|---|---|
| 1 | ||||||
| 2 | 3 | 4 | 5 | 6 | 7 | 8 |
| 9 | 10 | 11 | 12 | 13 | 14 | 15 |
| 16 | 17 | 18 | 19 | 20 | 21 | 22 |
| 23 | 24 | 25 | 26 | 27 | 28 | 29 |
| 30 | 31 |
- SpringBoot
- MSSQL
- Source
- ubuntu
- Open Source
- Core Java
- AJAX
- Thymeleaf
- JavaScript
- IntelliJ
- 문서
- STS
- maven
- Eclipse
- JDBC
- Spring Boot
- Python
- error
- PostgreSQL
- Exception
- myBatis
- jpa
- 설정
- 오픈소스
- git
- oracle
- MySQL
- Tomcat
- Docker
- spring
- Today
- Total
헤르메스 LIFE
[STS] STS 3.9.17 Spring MVC 프로젝트 생성 본문
Fastcampus 강의를 듣고 환경셋팅을 따라하다가 기록을 남기게 되었습니다.
STS 3.9.17
https://docs.spring.io/sts/nan/v3917/NewAndNoteworthy.html
Spring Tool Suite 3.9.17 - New and Noteworthy
Spring Tool Suite 3.9.17: New and Noteworthy Important Note This is a minor bugfix and maintenance release that we ship to our existing STS3 users beyond the announced maintenance lifespan for your convenience. We strongly recommend to update to the new Sp
docs.spring.io
Spring 3.1.1
STS 3.9.17는 jdk 11 을 사용해야 합니다.
STS ini 파일( SpringToolSuite4.ini ) 설정변경
-startup
plugins/org.eclipse.equinox.launcher_1.6.200.v20210416-2027.jar
--launcher.library
plugins/org.eclipse.equinox.launcher.win32.win32.x86_64_1.2.200.v20210429-1609
-product
org.springsource.sts.ide
--launcher.defaultAction
openFile
-vm
C:/project/jdk/OpenJDK11.0.14_9_x64/bin/javaw.exe
-vmargs
-Dosgi.requiredJavaVersion=11
-Dosgi.dataAreaRequiresExplicitInit=true
-Xms256m
-Xmx2048m
--add-modules=ALL-SYSTEM
-Dosgi.module.lock.timeout=10
1. Spring Legacy Project

2. Spring MVC Project

Spring MVC Project 가 보이지 않을 경우
Configure templates 선택 > spring-defaults 를 선택하시면 됩니다.

3. Project Name : firstSpring

4. package : first.simple.app ( ex, com.company )

5. Spring MVC Default 환경이 생성된 모습입니다.
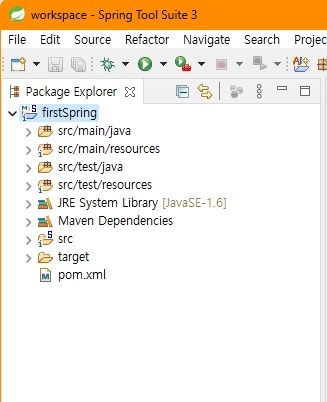
오류가 발생하는 경우 프로젝트에 JDK 설정과 Server 설정이 맞지 않아서 입니다.
Windows > Preferences > Java > Installed JREs >> Add

Windows > Preferences > Server > Runtime Environments >> Add

6. Project 를 선택 ( Alt + Enter ) > Properties > Java Build Path >> Add Library
>> JDK 11 로 변경
>> Apache Tomcat v9.0 등록

Properties > Java Compiler 확인

Properties > Project Facets 확인

7. 서버 실행

8. Server 선택

9. 프로젝트 선택

10. 내장 브라우저로 실행된 모습

'Eclipse와 IntelliJ 관련' 카테고리의 다른 글
| [Ubuntu] STS 4.22.0 설치 (0) | 2024.04.25 |
|---|---|
| [IntelliJ] package springfox.documentation.builders does not exist (1) | 2024.02.06 |
| [STS] STS 설치 - 4.17.1.RELEASE (0) | 2023.01.29 |
| STS 에서 Maven Build 하는 방법 (0) | 2022.06.26 |
| [Lombok] IntelliJ 에서 Lombok 사용 (1) | 2022.03.22 |


