| 일 | 월 | 화 | 수 | 목 | 금 | 토 |
|---|---|---|---|---|---|---|
| 1 | 2 | 3 | 4 | 5 | 6 | 7 |
| 8 | 9 | 10 | 11 | 12 | 13 | 14 |
| 15 | 16 | 17 | 18 | 19 | 20 | 21 |
| 22 | 23 | 24 | 25 | 26 | 27 | 28 |
- IntelliJ
- SpringBoot
- myBatis
- Python
- 설정
- Docker
- MySQL
- Exception
- Source
- ubuntu
- STS
- MSSQL
- oracle
- JavaScript
- AJAX
- git
- Core Java
- 문서
- error
- 오픈소스
- Spring Boot
- Tomcat
- jpa
- Thymeleaf
- spring
- JDBC
- Eclipse
- Open Source
- maven
- PostgreSQL
- Today
- Total
헤르메스 LIFE
[Spring Boot] STS 를 이용한 Spring Boot 개발환경 테스트 본문
어떤 프로젝트를 하게 될지는 모르겠지만, 일단 기본 셋팅은 해야 하니까 남겨둡니다.
1. STS 버전 : 4.13.1
2. JDK 버전 : OpenJDK 11.0.14_9_x64
3. Tomcat 버전 : 9.0.56
4. Maven 버전 : 3.8.4
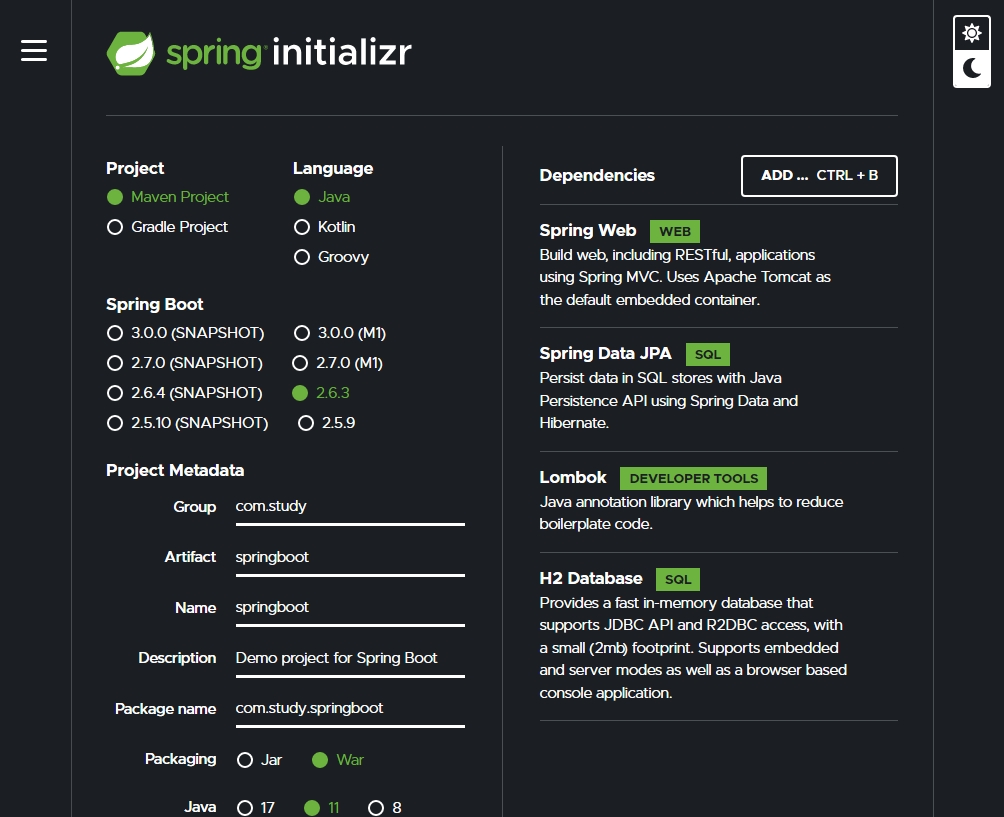
5. Spring 버전 : Spring Boot 2.6.3
6. Database 버전 : H2 Database 1.4.200
1. STS 설치
https://hermeslog.tistory.com/564?category=1077701
[STS] STS 설치 - 4.13.1.RELEASE
어느 순간부터 STS 설치하는 방법이 낫설어 졌습니다. jar 파일로 다운되기 시작해서입니다. 그냥 기억하기 위해 기록을 남겨둡니다. 1. 다운로드 ( https://spring.io/tools ) 2. spring-tool-suite-4-4.13.1.RE..
hermeslog.tistory.com
2. STS 설정
https://hermeslog.tistory.com/565?category=1077701
[STS] STS 설정
1. STS ini 파일( SpringToolSuite4.ini ) 설정변경 -startup plugins/org.eclipse.equinox.launcher_1.6.400.v20210924-0641.jar --launcher.library plugins/org.eclipse.equinox.launcher.win32.win32.x86_64_1..
hermeslog.tistory.com
3. Spring Boot 기본 프로젝트 생성

4. Import 프로젝트
- 내려받은 zip 파일을 적당한 위치에 압축을 뿐 다음.
- [File] > [Import] > Maven > Existing Maven Projects


5. Application 시작
- Tomcat 이 9.0.56 버전이고, 8080 Port로 시작된것이 보여집니다. ( 내장 Tomcat 엔진이 실행됐습니다. )

6. Tomcat Port 변경
- application.yml 설정
server:
  port: 9090
7. "Hello Spring"
package com.study.springboot.controller;

import org.springframework.web.bind.annotation.GetMapping;
import org.springframework.web.bind.annotation.RestController;

@RestController
public class HelloController {
	@GetMapping("/hello")
	public String hello() {
		return "Hello Spring";
	}
}
7. 재시작

8. H2 Data 설정
https://hermeslog.tistory.com/538
[SpringBoot] H2 Database 연결하기
내용은 간단합니다. IDE : IntelliJ JDK : OpenJDK 11 Framework : Spring Boot 2.5.2 <?xml version="1.0" encoding="UTF-8"?> 4.0.0 org.springframework.boot spring-boot-starter-parent 2.5.2 com.h2 H2Runn..
hermeslog.tistory.com
- application.yml
server:
  port: 9090                     # port 9090 으로 설정

spring:
  h2:
    console:
      enabled: true              # h2 Database를 사용함.
      path: /h2-console          # localhost:9090/h2-console 로 접속

  datasource:
    url: jdbc:h2:mem:testdb      # h2 Database의 Default Database
    driver-class-name: org.h2.Driver
    username: sa                 # h2 Database의 Default User
    password:
9. H2 Database 연결
package com.study.springboot;

import java.sql.Connection;
import java.sql.Statement;

import javax.sql.DataSource;

import org.slf4j.Logger;
import org.slf4j.LoggerFactory;
import org.springframework.beans.factory.annotation.Autowired;
import org.springframework.boot.ApplicationArguments;
import org.springframework.boot.ApplicationRunner;
import org.springframework.jdbc.core.JdbcTemplate;
import org.springframework.stereotype.Component;

@Component
public class H2Runner implements ApplicationRunner {
    private static final Logger logger = LoggerFactory.getLogger(H2Runner.class);

    @Autowired
    DataSource dataSource;

    @Autowired
    JdbcTemplate jdbcTemplate;

    @Override
    public void run(ApplicationArguments args) throws Exception {
        // 1. DataSource를 @Autowired 할 수 있다.
        // try-with-resources
        try (Connection connection = dataSource.getConnection()) {
            String url      = connection.getMetaData().getURL();
            String userName = connection.getMetaData().getUserName();

            logger.debug("url :: {}", url);
            logger.debug("userName :: {}", userName);

            Statement statement = connection.createStatement();
            String    sql       = "CREATE TABLE USER(ID INTEGER NOT NULL, NAME VARCHAR(255), PRIMARY KEY (id))";
            statement.executeUpdate(sql);

            connection.close();
        }

        // 2. JdbcTemplate를 @Autowired 할 수 있다.
        // 이게 더 좋은 방법임. try-catch 같은걸 사용하지 않아도 됨.
        String sql = "INSERT INTO USER VALUES (1, 'JYP')";
        jdbcTemplate.execute(sql);

    }

}
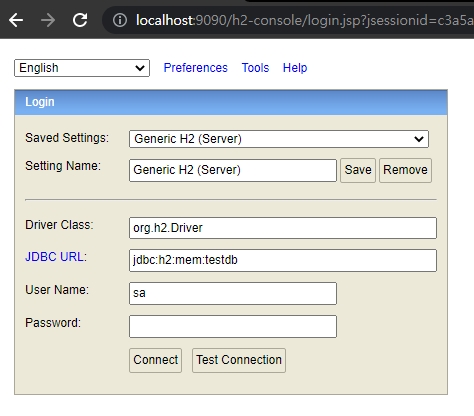
10. H2 DB 접속
- Spring Boot Application을 재시작합니다.
- http://localhost:9090/h2-console

- JDBC URL : jdbc:h2:mem:testdb
- User Name : sa
11. Login / 확인
- 정상적으로 USER 테이블이 생성된것을 확인 할 수 있습니다.
- 정상적으로 테이터가 INSERT 된 것을 확인 할 수 있습니다.

Spring 은 Spring-JDBC가 classpath 에 있으면 자동으로 필요한 빈을 설정해준다고 합니다. ( 백기선님의 강의 내용 중 .. )
- DataSource
- JdbcTemplate
이때 In-memory Database를 먼저 Load 한다고 합니다.
- 참고 : spring-boot-autoconfigure-xxx.jar > DataSourceProperties.java
-> determineDatabaseName : testdb 라는 이름으로
-> username : sa 라는 이름으로
'Spring Boot Framework' 카테고리의 다른 글
| [Spring Boot] HikariCP를 이용한 Multi Database Connection + JPA (0) | 2022.02.24 |
|---|---|
| [Spring Boot] HikariCP를 이용한 Database Connection + JPA (0) | 2022.02.11 |
| [SpringBoot] JPA Entity 생성 테스트 (0) | 2021.12.01 |
| [SpringBoot] Logback 설정 (3) | 2021.07.30 |
| [SpringBoot] Interceptor (0) | 2021.07.28 |

